The rubric is how work gets scored. It is the single most important thing you set up, because everything the assistant proposes is measured against it. You build it on the rubric canvas, and you can go as light or as detailed as you like.
Criteria
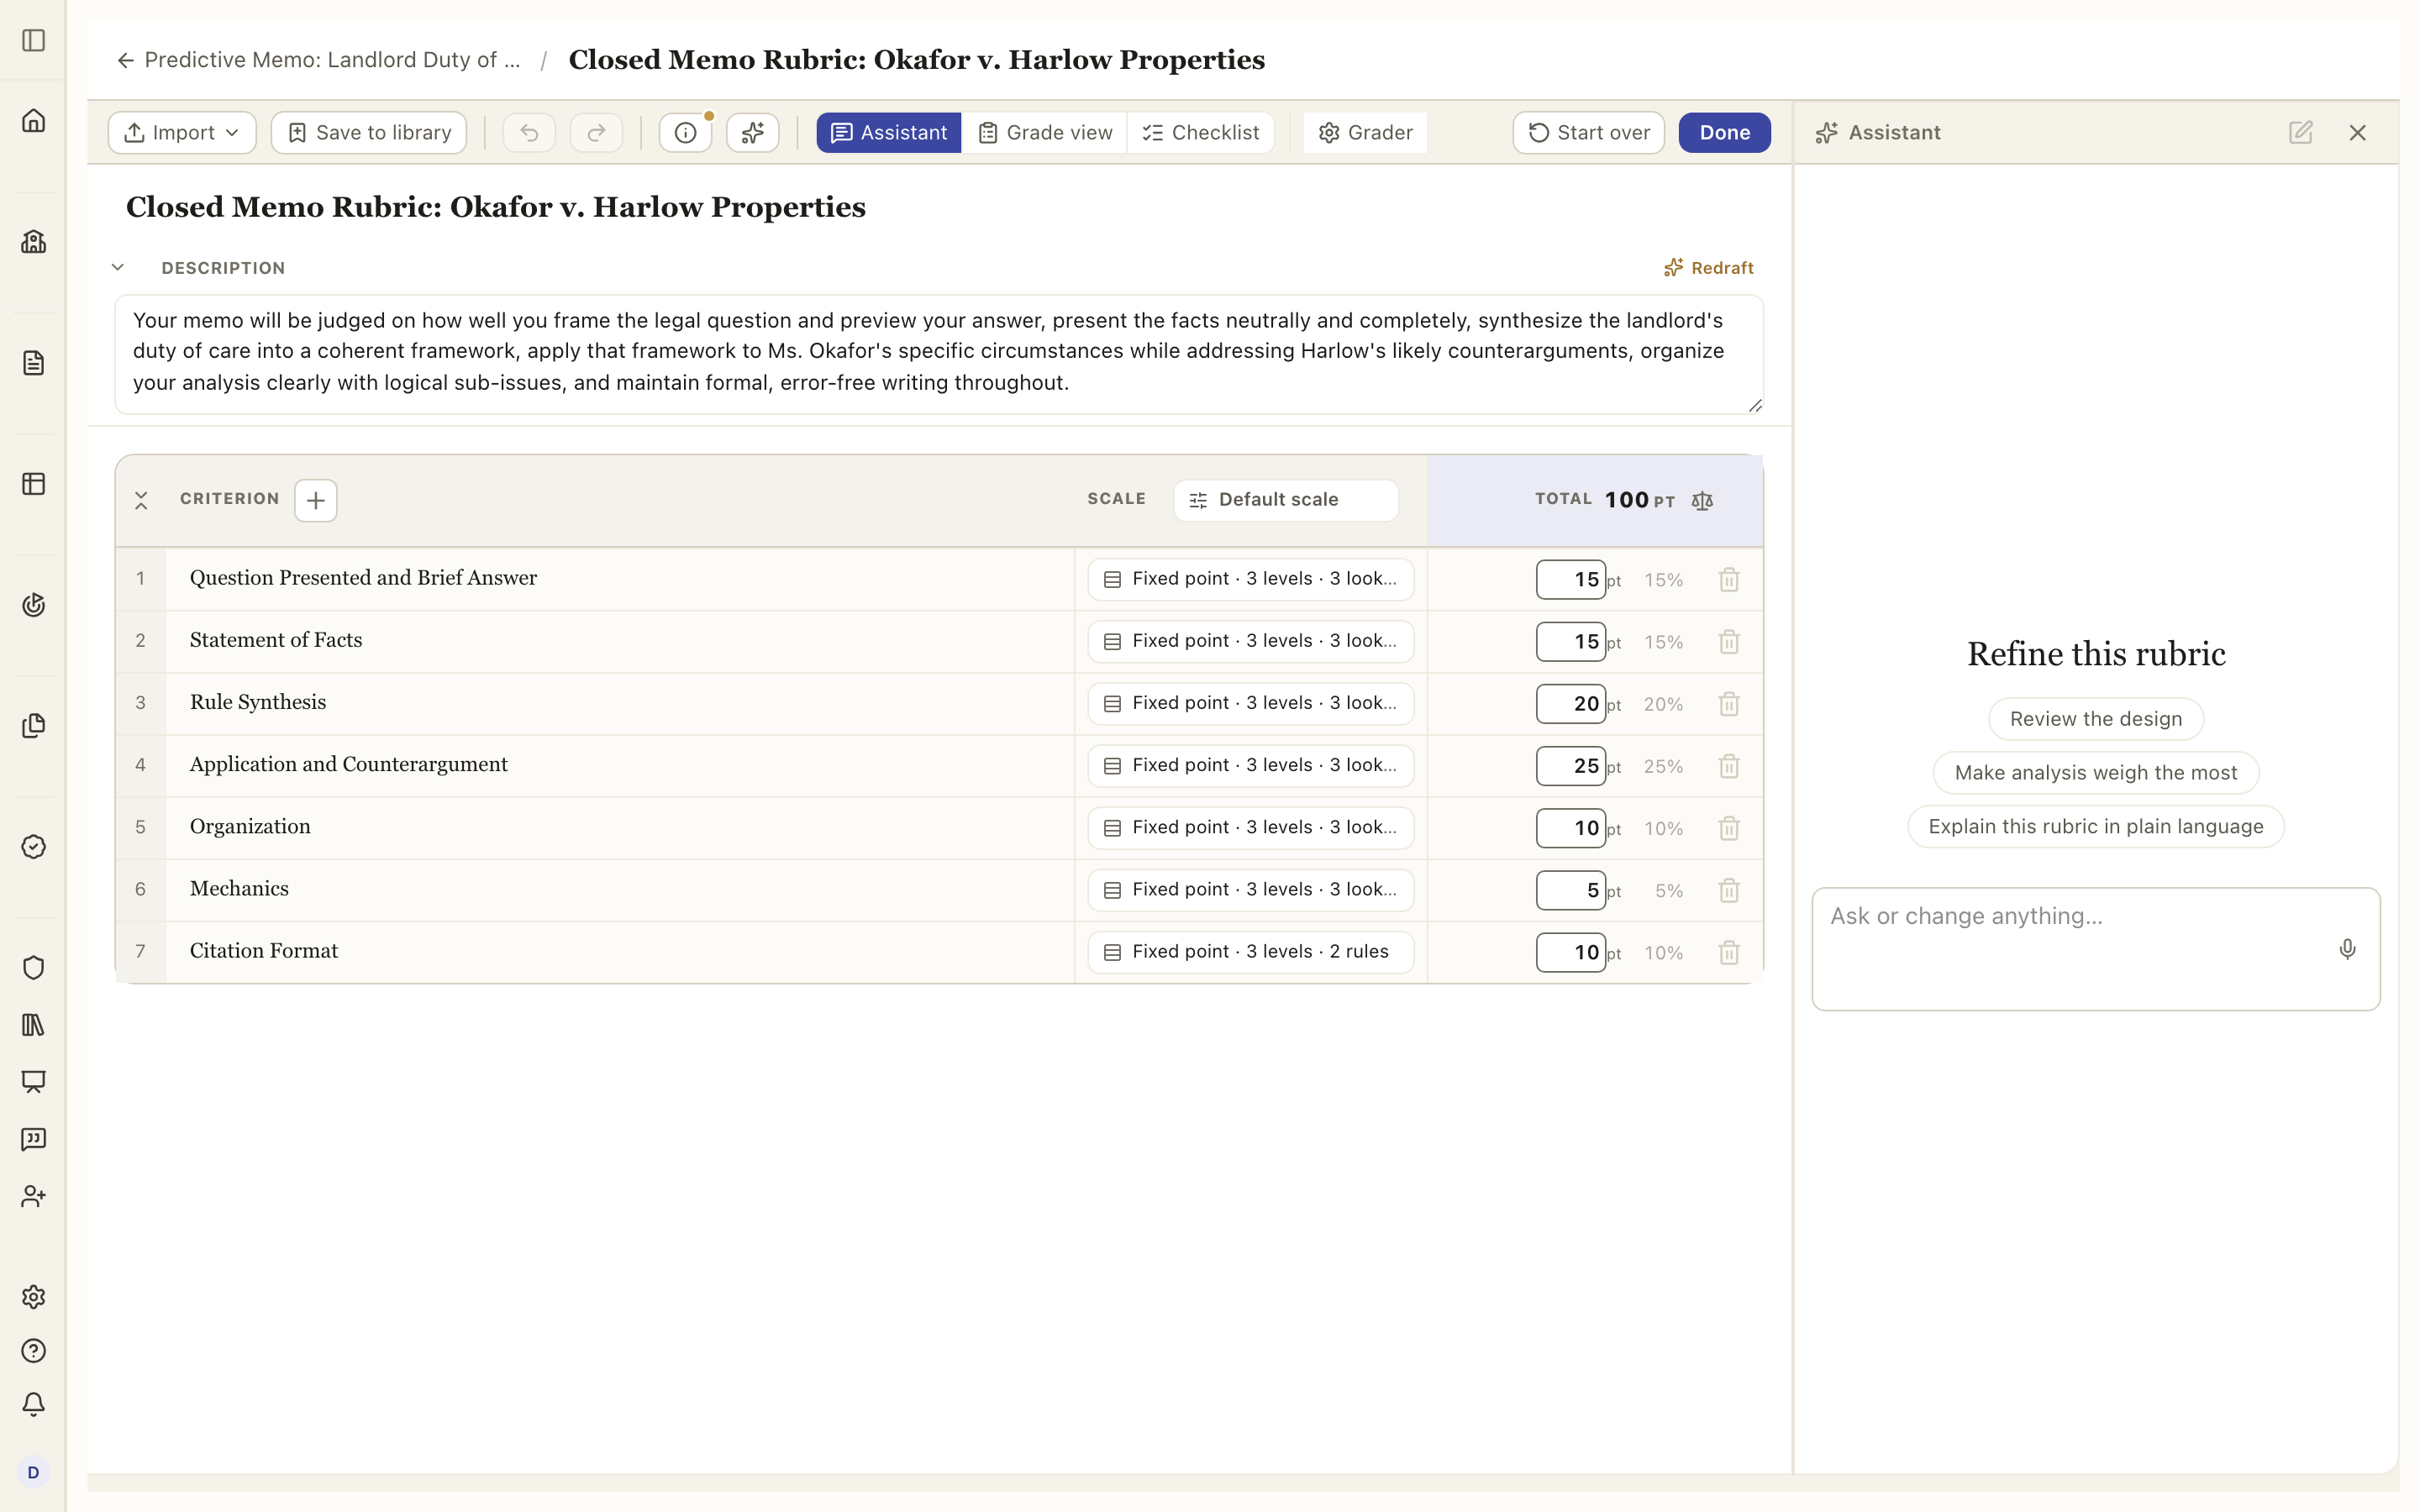
A rubric is a list of criteria, the things you are grading (for example, Thesis, Evidence, Mechanics). Add one with the + beside the Criterion column header, and give each a short description of what it measures. A criterion can hold sub-criteria if you want to break it down further, and each rolls up into its parent.
How each criterion is measured
Every criterion is scored on levels, from strongest to weakest (Exemplary, Competent, Developing, and so on). You choose how much detail to write:
- Target level only: one description of what good work looks like for that criterion (single-point style).
- Every level: a distinct description for every level, so the assistant (and the student) sees exactly what separates an Exemplary from a Developing.
This is a grading decision, not just a layout one: the assistant reads whatever descriptions you write, so a full grid tells it exactly where each band starts, while target-only leaves it to judge the other bands against the rubric's own level definitions. The choice sits inside the criterion's scale editor, on the Describe switch, because it only means something once the criterion has levels to describe. Open it from the criterion's scale chip. Expanding turns the look-fors into a grid with a column per level; collapsing keeps every level description you wrote, so you can switch back and forth freely.
How a criterion is scored
Open Set up criterion from any criterion's row and you get the whole thing in one place, as four steps: the criterion itself, its scoring, its grading notes, and its rules. The same screen has a Judge from the rendered page switch. A row about the page itself (a headshot, a table, typography, layout) is read from the page images as well as the text; everything else is read from the parsed text. Rows with page vocabulary are switched on for you when the rubric saves, and you can change any of them here.
Scoring is one question with five answers, and picking one is the whole decision:
- Fixed point — you name a level and the criterion takes that level's points. Levels carry whole level values (5 down to 1 by default, or whatever whole numbers you type), and the points beside each show what that level pays on this criterion, always a whole number.
- Range — you give a score and it lands in whichever level holds it. Ranges need room to work: on a criterion worth only a few points, whole-point rounding can leave each level holding a single score, which is what Fixed point already does. The level editor says so when it happens, and finer rounding or more points on the criterion fixes it.
- Points only — no levels at all, just a number up to what the criterion is worth. The one setting is how finely you can type it: whole points, halves, or tenths.
- Rules — the rules below carry the points and the criterion is worth their sum. Good for mechanical, countable requirements; Equal weight divides the points evenly across them. Keep judgment criteria, like argument quality or writing, on levels, since summing items there flattens real differences between papers.
- Not scored — still judged, still commented on, but adds nothing to the total.
Switching between them never loses work quietly: an option that would cost you something says so on the option itself before you pick it.
A criterion with rows underneath it that are each scored and added up is a section, and a section has no scoring of its own, since its number is the sum of its parts. A criterion scored by Rules is not a section: its items are what score it, so it is set up like any other criterion, and each item opens its own Set up with its points and its grading note.
The Scale column header sets the scale for the whole rubric. It shows the scale in force next to the word Scale, and clicking it opens the editor, where you can rename the levels, add or remove one, or pick a preset like Excellent → Poor. The preset you are on stays highlighted. Levels are evenly spaced unless you say otherwise, so the editor shows you names and nothing else; if you need an uneven ladder, say a lowest band that still earns half credit, open Custom spacing and each level takes one number. A change there reaches every criterion that follows the rubric scale; a criterion you have given its own scale keeps it. When some do, a button at the bottom of the editor, Apply to the N criteria with their own scale, replaces theirs with the default too, names them when you hover it, and confirms how many rows it applied to.
The fastest way to fix a single label is to click it where you see it: the level headers above a criterion's grid are clickable, and open the editor with that label ready to rename. In the Scale column, a criterion that differs from the rubric wears a chip naming its own ladder; a criterion that follows the default stays quiet until you hover it, where a Same as rubric chip is the door to give just that criterion its own labels. Forking a criterion starts from the ladder it was already on, so the levels, points, and descriptions carry over and you only change what you meant to (say, renaming one criterion's lowest level to Missing while the rest of the rubric keeps Basic).
Points
Every criterion is worth points, and you type them on its line. Next to each one, in grey, is that criterion's share of the grade as a percentage. That is a readout, not a field: it follows the points and you never have to set it. If you think in percentages, keep the rubric out of 100 and the two numbers are the same.
The Total in the points column header is what the whole assignment is worth, and it is the points column added up. You do not set it; you set the criteria, and the total follows. So what you read at the top of the column is always exactly what a student can earn, and it can never disagree with the lines beneath it.
To move the whole rubric at once, use the scale icon beside the total. Rescale takes a number and re-prices every criterion to fit it, each one keeping its share: making a 100-point rubric worth 70 turns a 20-point criterion into 14 without you touching a line, and level values follow too. It is the quick way to fit a rubric you imported to an assignment worth something else. Split evenly in the same place divides the total equally across every scored criterion, which is what you want on a fresh rubric. Points land on halves either way.
Some rubrics arrive with no points at all, usually because the document they came from never stated any. The sheet says so plainly under the last row: no criterion is worth any points, so the rubric cannot produce a score. Nothing will grade against it until the criteria are worth something, so give them points yourself or use Even them out to split them and adjust from there.
Getting a head start
You do not have to build from a blank canvas. Every way in sits behind one Import button in the builder toolbar, which opens a panel with the ways to start down the left: the doors that bring a file in at the top, and your shelves of existing rubrics under them. Only one shelf shows at a time, and the search finds a rubric across all of them at once.
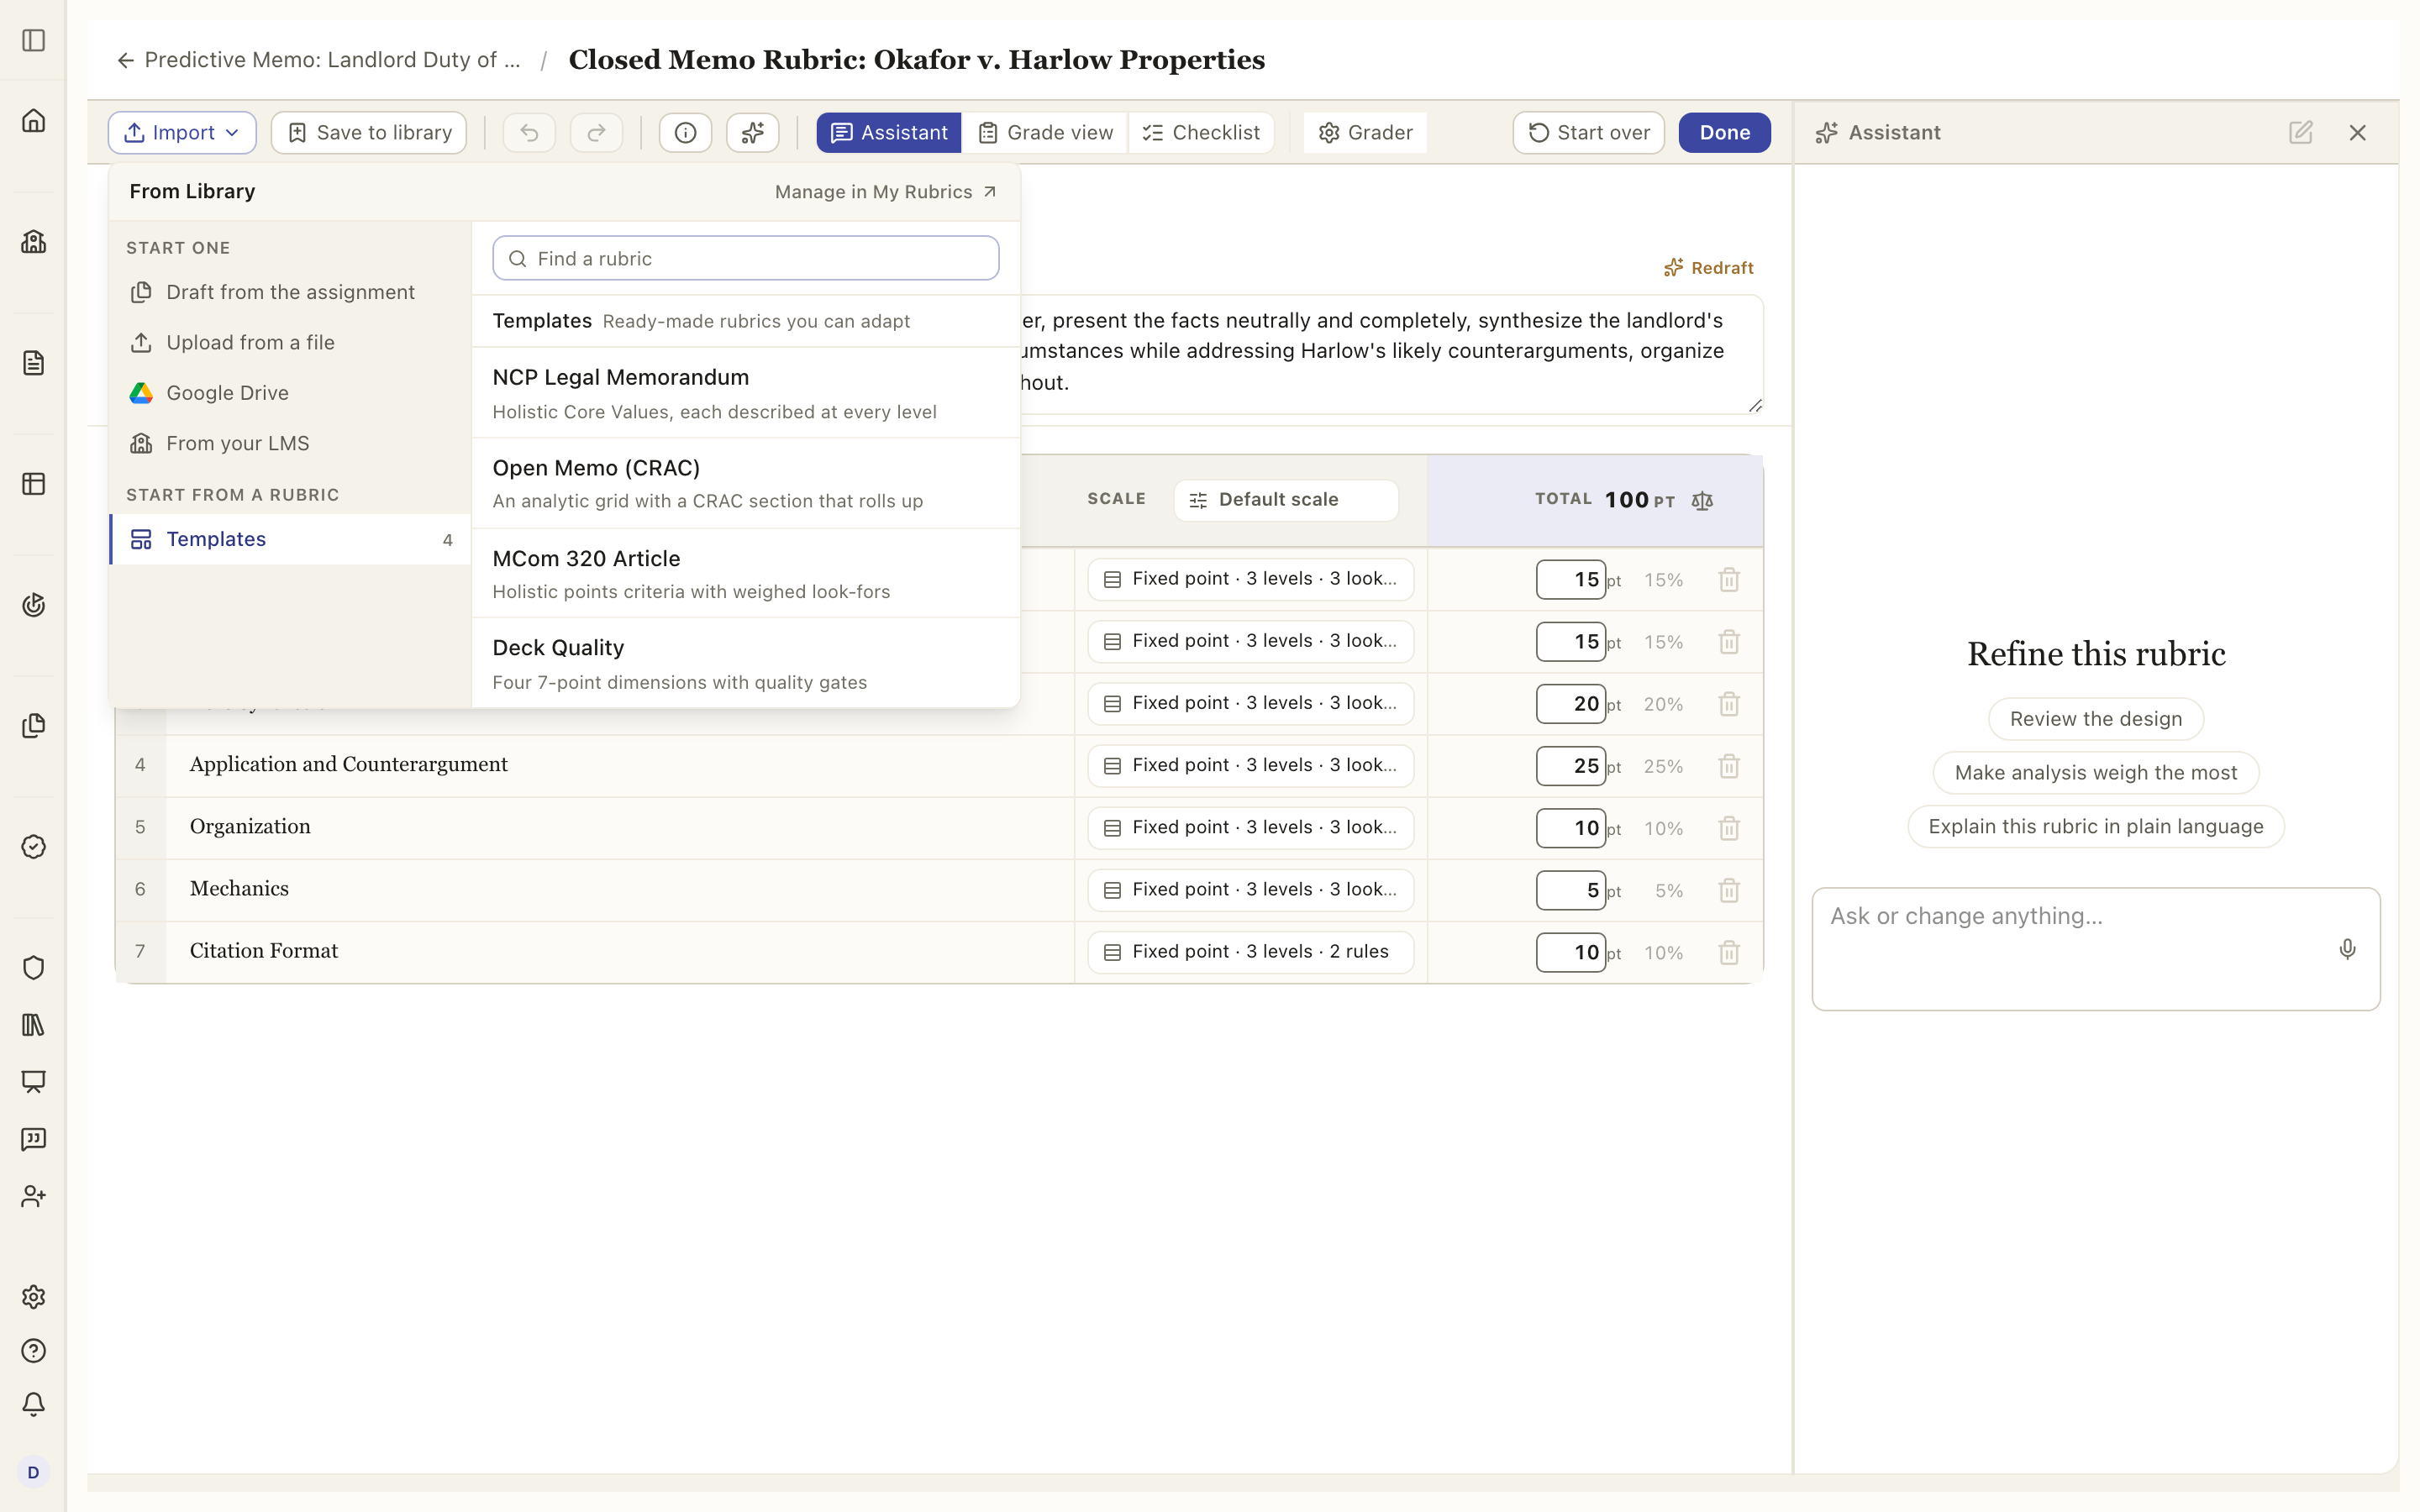
- Upload from a file brings in a rubric you already have (a Word doc, a PDF, a spreadsheet). Reading a dense rubric takes a little while, so the Assistant narrates each step as it goes and tells you how long it has been working. A longer wait also brings up short pointers about the builder, so the time is not wasted.
- From Canvas pulls in a rubric already built in your linked Canvas course. Canvas rubrics are fully structured, so this is a direct copy, no reading required. It is one-way: edits here do not sync back to Canvas. A Canvas rubric often leaves a criterion's detail to the assignment prompt ("make the table according to the assignment instructions"), so when a criterion defers like that and has no grading note of its own, the import drafts one from the prompt you imported alongside it. The assistant's greeting says how many it filled, and "drop what came from the prompt" clears them again; a note you have since edited is yours and stays. If your class is not linked to a course yet it opens the link step first, then the import.
- Draft from the assignment proposes a whole rubric from the prompt you wrote, which you then refine in chat. It is the first row in the panel on an assignment that has a description. On a rubric that already has criteria it asks first, because drafting replaces them.
- The shelves hold every rubric that already exists somewhere: Shared with me (what your department has published, kept in sync, and the shelf that leads the list), My rubrics (everything you have built, newest first), My assignments (copy the rubric off one of your own past assignments), and Templates (ready-made, matched to the kind of writing your site is set up for). A shelf you have nothing on does not appear.
- Save to library, next to Import in the toolbar, keeps a copy of the rubric you are looking at on your own shelf, one that stays editable after this assignment is graded. The button fills in once the copy is made and a notice offers to open it.
- Export PDF, beside it, downloads the whole rubric as one page-wide table, the way you would review it on paper: every criterion with its level descriptions in a row, and its look-fors, rules and AI grading notes indented underneath. It exports what is on screen, unsaved edits included, and works on a locked rubric too.
- Use the Assistant to draft or refine the rubric by describing what you want in plain language. Its opening chips are a good tour: Review the design reads the whole rubric and says where criteria overlap, where a level is undefined, or where the points do not match the emphasis; Explain this rubric in plain language is the student-facing summary. Ask "how does this look?" any time for the same review. It is one of three panels that share the right-hand side, picked from the toolbar: Assistant, Grade view, and Checklist. One is open at a time and fills the height, and clicking the one already open closes the panel.
- Fill in rubric fills in whatever is still blank (missing descriptions, level cells, AI grading notes) without overwriting anything you have already written.
The three panels on the right
The toolbar picks what sits beside the sheet: Assistant, Grade view or Checklist. One is open at a time.
- Assistant edits the rubric with you in plain language, and reviews it on request (see above).
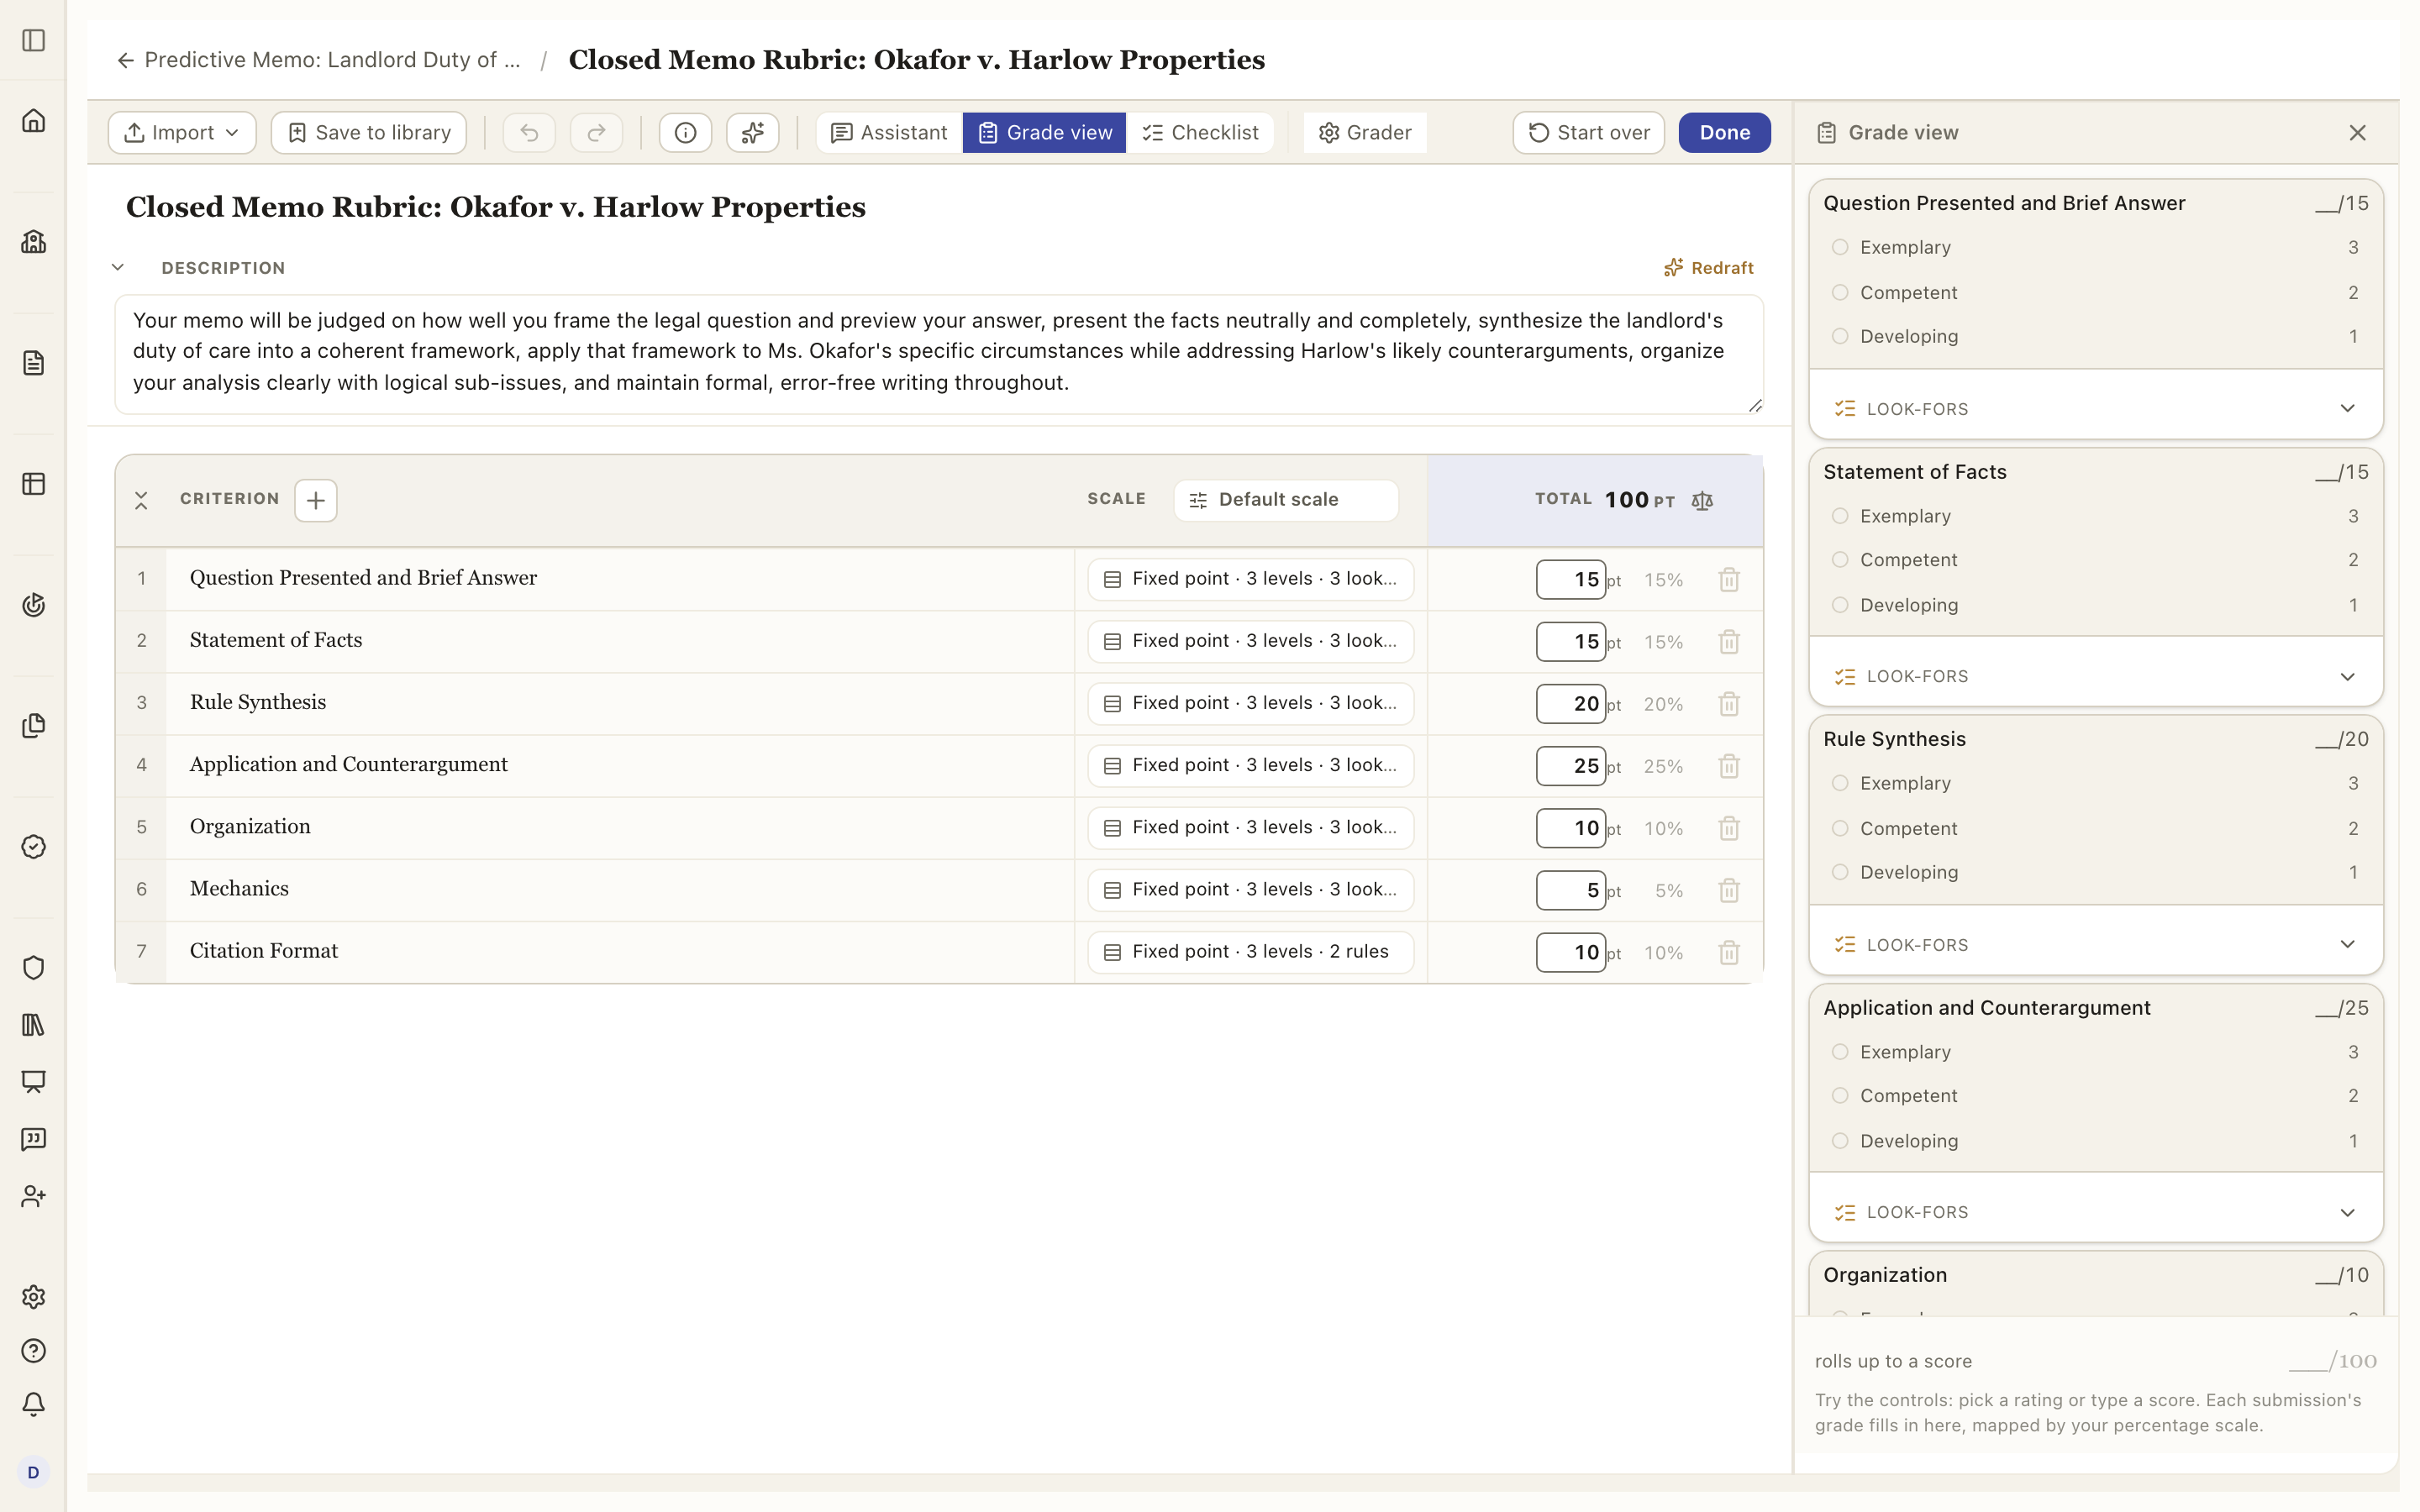
- Grade view is the real grade rail, projected from the rubric you are building: every criterion card as a teacher will see it on a paper, with its levels and points. Open it while you edit and the effect of a change (a renamed level, a reweighted criterion, a new rule) shows immediately, before any paper is graded.
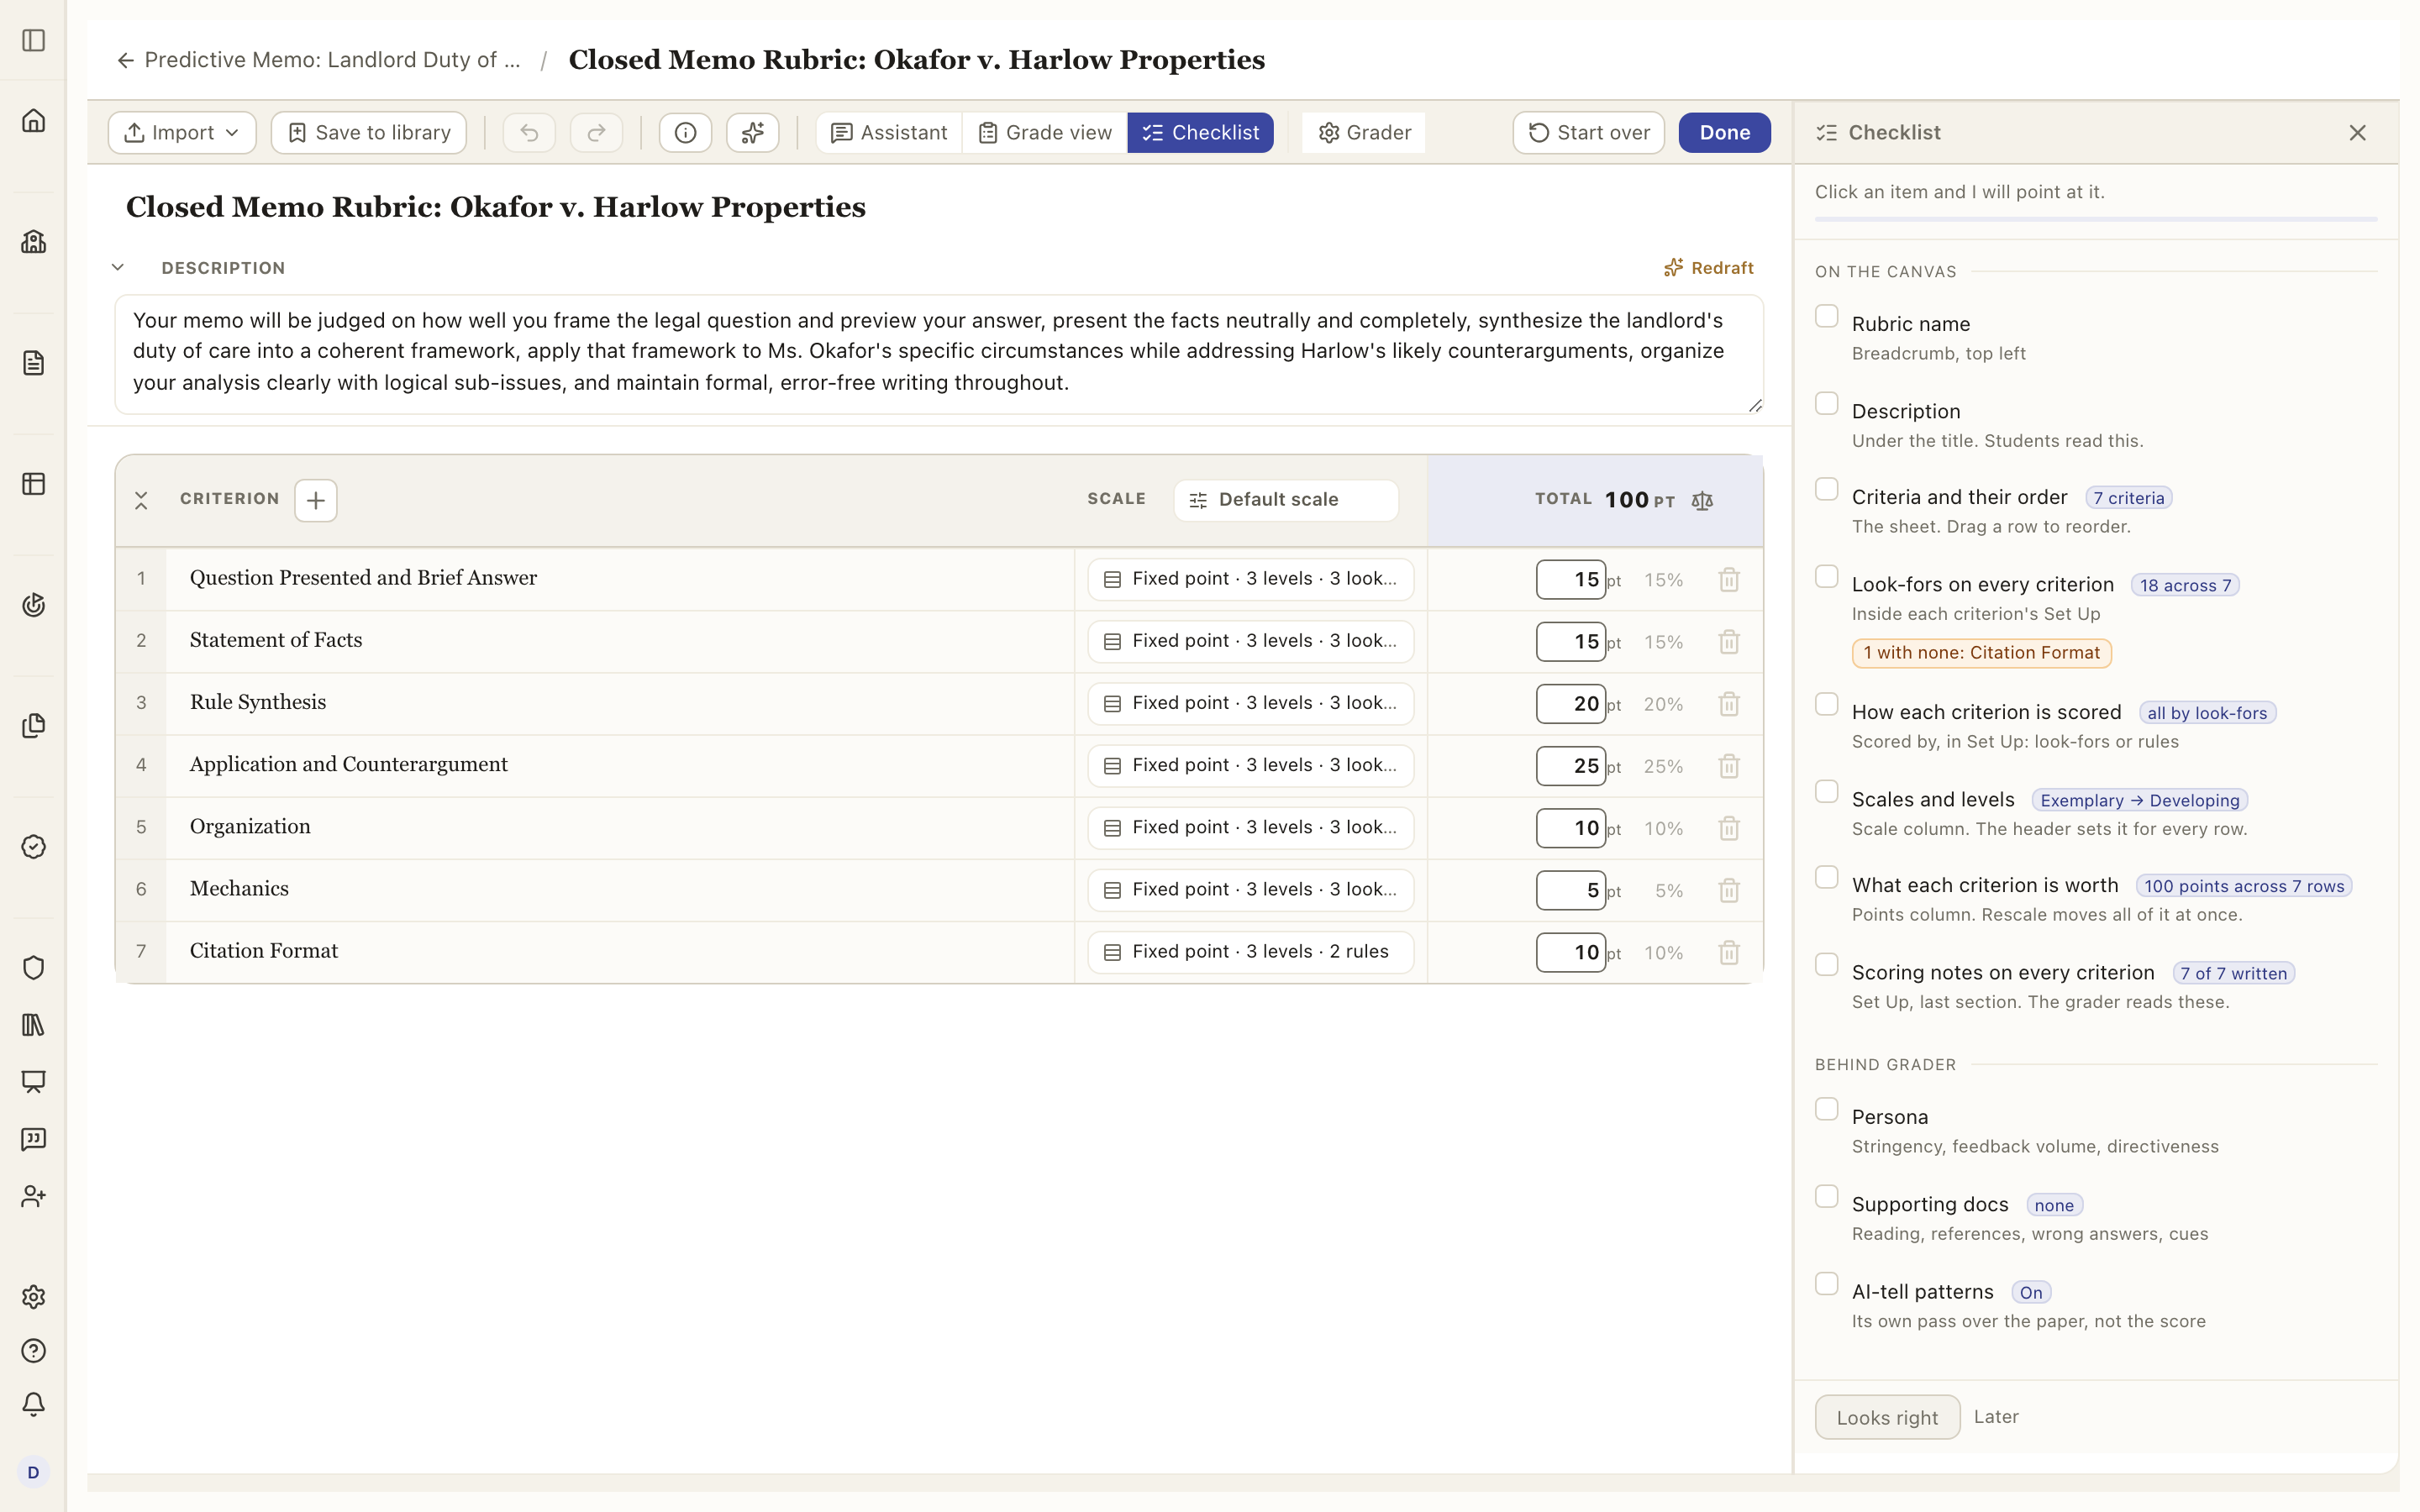
- Checklist is the post-build review: the parts of this rubric worth looking at once, each derived from the rubric itself rather than a generic tour. It counts what it finds (18 across 7 look-fors, 100 points across 7 rows) and flags the gaps (1 with none: Citation Format). Click an item and the builder points at the control that owns it. Behind grader lists what the grader reads that is not on the sheet: the persona, the supporting docs, whether the AI-tell pass is on. Looks right ticks the whole list when you are satisfied; Later leaves it for next time.
Extras
- Rules are the specific things the grader checks on a criterion, one by one. Every rule belongs to one criterion, and they all live in one list in Set up criterion (the Rules column on the row is the other door). Each rule is worth one of three things: Note it (flagged on the paper, score unchanged), Require (unmet scores zero), or a points amount you type — positive is earned when the rule is met, negative comes off when it is missed, and Apply per occurrence makes the amount fire once for each distinct instance the grader finds ("minus one for each comma splice"). You can start from the rule library instead of writing one from scratch.
- The box under the rules list, Type to search library rules, or describe your own, offers common checks (a citation form, a word limit, a required section) or turns a sentence of yours into a rule. For a criterion whose whole score is its rules, and what the rail shows for one, see Scoring a criterion with rules.
- Rules are optional on every criterion except one. Under Fixed point, Range or Points only they adjust a score the criterion has already been given, so the list shows the swing they can apply. Under Rules scoring they _are_ the score, so the criterion needs at least one and the list shows the total they carry (change a rule's points there and the criterion's worth changes with it). On a Not scored criterion there is no number to move, so a rule can require or note something but cannot carry points.
- AI grading notes are private guidance to the assistant about how you want a criterion judged. They are read by the grader and never shown on a paper.
- A student preamble is text students read before they submit.
The clearer the rubric, the more useful and consistent the feedback. See How grading works for what happens once it is set.